Sunday 31 October 2010

ENJOY THE JOURNEY

Hi all,
a quick post today,
Here's my entry for the stamp man challenge
the theme this time is CARDS FOR MEN,
click on there name to read all the challenge details.


I used Tim Holtz stamps,
a piece of map paper,
jumbo java chalk ink,
black embossing powder,
brushed corduroy distress ink,
ribbon & buttons
brown card for matting,
& a 5x5inch cream card.


On this card I decided to keep it quite minimal,


I'm pleased with the ribbon trim,
I think it has finished the card off,
& it's such an easy thing to do.


Hope you like it.
I love using a neutral colour pallet,
for me I feel you can make something vintage looking,
or you can make something that looks  more modern,
with the same stash.

well thats it from me today,
I'm off to cook a roast with all the trimmings 'yummy'
thanks for stopping by,
bach soon,
Kat x.


Wednesday 27 October 2010

***SPOOKEY HALLOWEEN SCREEN***

Over at simon says stamp and show blog,
the challenge this week is to;-SHOW SOMETHING SPOOKY
head over there & check it out.

I don't have anything in my stash that's hallo weeny
I thought OH NO I will have to sit this weeks challenge out,
then this idea hit me,
I could use other things, (as long as I included stamps on the project)
so this is what I came up with.


I used orange & black card,
Tim Holtz alterations tree branch die
Tim Holtz birds stamps,
Wendy Vecchi's splatter stamp,
distress inks in crushed olive, peeled paint, forest moss,
wild honey and rusty hinge,
some clip art images,
patterned papers, string & an alphabet sheet for the bunting,
& a battery operated tea light.


I masked off the hills with scrap paper & blended distress inks,
to make the landscape, then stamped the birds & splatter,


This picture shows it off a bit better I think,


this is what the screen looks like with the tea light
lite, I think It makes it look spoooooooky,


Now I know my pumpkin tree is not politically correct & that
pumpkins grow on a vine on the ground,
(but in my world this is how we roll lol)

Hope you like it,
 it was lots of fun to make.


Thanks for stopping by,
back soon,
Kat x.

EXTREME MASKING, TATTERD FLORALS TAG.

It's week 19 of the
 COMPENDIUM OF CURIOSITIES challenge,
the technique this week is EXTREME MASKING,

If your not sure what I'm on about,
head over to studio L3 to read all the details.

So here's my entry, I love how crisp the technique turned out.


I liked it so much I didn't want to cover it up with a lot of embellishment,


Check out Tim's book for this technique,
the distress ink colours I used were,
wild honey, crushed olive, frayed burlap & old paper.


The sentiment is a Wendy Vecchi's
stamped in black archival & embossed in clear powder,
then coloured with barn door distress ink,

ribbon, buttons & string are from my ever growing stash lol.


More pictures than words this post
(just how I like it)

that's me done for today, I'm off to watch some TV,
thanks for stopping by,
back soon Kat x.

Monday 25 October 2010

TIP or TECHNIQUE TUESDAY ****BOTTLE CAP****

Hi all,
I have had a few questions in the comments
about the bottle cap embellishment I made for this tag,
So I thought I would talk you through it,


Yes it is a normal bottle cap from beers
that were consumed at my Nephews 21st birthday party,
I was going around collecting them from everyone,
(by the end of the night I had
everyone coming to me, my pockets were stuffed)


Here's just a few to show you.


I have used the same type of cap for this demo as I used for the tag
(just to keep it simple)


It's silver on the outside & gold on the inside,


I used my bug with plates A & C
to do the initial squish,


Run through once,


This is what it comes out like,
(it's OK but not quite neat enough for me yet)


I took my pliers
& gently squeezed the last bits, to even it all out.


here's a different angle,


this is what the underside looks like,


There's a rubbery plastic part, you can leave it in if you wish,
but I wanted the gold to show
so I pulled it off,


the remaining glue, I found came right off
 if you scratched it with your finger nail,


I chose to cut a clock from Tim's lost & found paper stack,


Glue it on with glossy accents,


I pushed a poky tool through the middle
(watch your fingers)
then added a game spinner.

I hope I have explained that clear enough,
& I hope you all find this useful,

next time you have a party save the bottle caps,
there's so many things you can do with them,
& the best part is, there free,

I would love to hear what you think,
& know what you would use them for,
please leave me a comment,
I always look back on posts (about a month or so)
 to see if there are any new comments,
(I hope that doesn't make me come off as being to desperate lol)
I do love to here from you.

well that's it for today,
thanks for stopping by,
Kat x.


Friday 22 October 2010

BLENDED BATIK CCC catch up

Hi all,
Busy catching up on the weeks I missed of the
COMPENDIUM OF CURIOSITIES challenge as I explained yesterday,
If you are unfamiliar with the challenge as I was,
head over to studio L3 to read all the details.

I have 2 tags to show today,

Tag number one includes the BLENDED BATIK technique,


After I had done the technique (check out Tim's book)
I found it to new looking, if that makes sense,
so i stamped all over it with a background stamp
in the same distress ink I used to blend (aged mahogany),
waited a few seconds, then wiped it off with paper towel
rubbing off more form the clock areas,(I love this affect)
the rest is self explanatory I think,
the charm bits at the bottom are from an elastic type bracelet
(yes another boot sale purchase)


Tag number two includes the ALCOHOL INK MONO PRINT technique,


After I had done the technique (check out Tim's book)
I stamped the images in black archival ink,
backed the whole thing with black glitter paper,
& punched out the circle bit for the tag hole out of the same paper aswell,
the metal part is a broach
(yes again another boot sale find)


Well I hope you like them,
Only 15 tags to go untill i'm all catched up,
good job I can do them at my leisure lol. 
I wonder what to new technique will be on Monday?

well I'm done for now,
thanks for stopping by,
back soon
 Kat x.


Thursday 21 October 2010

DABBER RESIST TECHNIQUE

This is the first time I have entered the
COMPENDIUM of CURIOSITIES challenge
(so be gentle with me lol)

This challenge is over at studio L3
It's been running for 18 weeks,
(where have I been?)
you can read all the details HERE

I stumbled across this challenge reading a post on Hels blog
(I clicked a link & decided to enter)

OK, This week the technique you must include in your artwork is
DABBER RESIST on page 37.

Here's my entry,


I used a manila tag, size 16cm x 8cm,

a paint dabber (snow cap)
not sure why mine didn't go back to white,
 I like the pink/green tinge anyway (luckily)

Distress inks
(frayed burlap, brushed corduroy,crushed olive & forest moss)

Tim's alteration dies
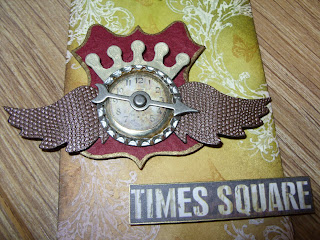
(regal crest & heart wings)

Archival ink,(coffee)

Lost & found paper stack,
(for the clock & wording)

Idea-ology (game spinner)

metallic ink pen (gold)
for edging the shield & wording,

All the stamps are Tim's

From my stash I used,
A bottle cap,
I ran it through the bug,
I expected it to flatten outwards,
instead it flattened out in wards (happy accident me thinks)

5 metal heart charms,
decorative paper scraps & some fibers.


I'm going to have to get busy,
I have 17 weeks to catch up on,
I have decided to make a tag for each technique,
& hang them round my craft room.

I know it's to late to enter them,
but I will show you them on the blog,
& I will try to enter the remaining weeks every time,
(if I write it down It's more likely to happen lol)

So wish me luck,
I'm off to link it up.
Thanks for stopping by,
Have a grate day
Kat x.

Tuesday 19 October 2010

VICTORIAN STYLE, INSPIRED MIRROR.

Here's my entry for the simon says stamp and show challenge
the theme this week is ANYTHING BUT A CARD.

I am also entering this for the the artistic stamper challenge
which this months theme is layers.

click on there names to be teller ported to there blogs
 to read all the details on how to enter your own creations.


I can't seem to stop making these mirror's
(I am now buying them in bulk, lol)

I used a sheet of 12 x 12 graphic 45 paper, cut it to size,
then stuck it down with Claudine Hellmuth multi matte medium,

I then blended Brushed Corduroy distress ink over in patches,
to give it an aged look,

I then wiped Walnut Stain over straight from the pad round the edges,

I took a silver paint dabber & applied it with my finger randomly over the surface.


I then set to work on the flower corsage part of the design,
(all the stamps are Wendy Vecchi's)
& stamped onto grunge paper,


The Distress Inks I used are,
Forest Moss & Peeled Paint for the 2 types of leaves,
& Victorian Velvet, Rusty Hinge & Milled Lavender for the flowers
( it's a strange combo, but I think it works)

I formed the flowers & leaves to give dimension.


The centers of the flowers are two pairs of earrings
& the butterfly is from a belt,
these are all from boot sale purchases.


look at how many butterfly's are on this belt,
I paid 50p for this, bargain hay!!!


I have used 2 pearly stick pins & 9 vintage metal buttons,
from my stash, all stuck with silicone glue.


I am so pleased with the way it turned out,
I hope you like it.

I put a white piece of paper over the mirror part
to make it easier to photograph,
so I don't get any reflections.

Thanks for stopping by today
Back soon,
Kat x.


TIP or TECHNIQUE TUESDAY ***WEEK 4***

Hi all where dose the time go?
It certainly fly's round here.

The tip today is a carry on from the last couple of tip or tech Tues
still sticking with distress inks.

Today I would like to show, my colour chart tags,
I made them so long ago they are looking tatty
(time to make new ones I think)


There is a tag for every colour of distress ink,
(they are white tags & not manila, so you get a true colour)

I am going to use the aged mahogany tag for the photos,
not for any reason other than it was the first one I grabbed.


I used the same stamps on each tag so it kept  them quite uniform,
I did choose the stamps carefully
I wanted a text stamp & a bold stamp that covered most of the tag,
so when I use them for matching colours
I can see what I want to use it for.

Each tag has it's colour name on the back
I used the ranger labels again,
here's the LINK to them if you missed it last time.


I stamped the images in the colour
& blended the same colour with a blending tool all over the tag,
(darker round the edges so you get a variation of colour,


I use these tags for matching
patterned papers & embellishments to my projects,

I also use them for depth of colour,
(that may sound strange,
but how many times have you used a colour
& it came out darker than you thought it would)

I have also taken them to the shops before now
when I needed to colour match something.

I hope you like this tip & find it helpful,

I'm sure if you make a set of these tags,
you will find other uses I haven't even thought of,

DON'T FORGET TO LEAVE A COMMENT
ON THE GIVE AWAY POST
CLICK THE PIC, TO ENTER, IT'S ON THE SIDE BAR,

Thanks for stopping by today,
Back soon,
Kat x.


Monday 18 October 2010

DRAW NUMBER TWO RULES

If you are reading this, draw number one has ended,
click on the picture on the side bar to see if you are the winner,

Draw number 2 will be drawn on,
TUESDAY 9TH NOVEMBER 2010


For your chance to enter all you need to do is,
A, become a follower, & then
B, leave a comment on this post,

There will be THREE lots of tickets going into draw number TWO,

TICKET LOT NUMBER 1,
is for everyone that leaves a comment on this post.

TICKET LOT NUMBER 2
is for everyone that has become a follower of my blog
by the time the draw takes place.

TICKET LOT NUMBER 3
is for everyone that qualifyed for draw number one,
( I will keep all the tickets safe & they will atomatically go into the draw)

If you commented in draw no ONE,
leave a comment here on this post & you will get a ticket in LOT 1 as well as LOT 3.

I hope that's clear to you all,

I will add another blog candy pickture on the side bar to link to this post
so you can leave your comments here,
ready for draw number two.

I would love to see my followers up to the 50 mark,
by the time the draw takes place (on the 9th of Nov)
how fab would that be.

Congrats again to Andrea, winner of draw number one.

Back soon Kat x.

Here's some close up pictures of what's on this blog..

Related Posts with Thumbnails