Tuesday, 31 August 2010

CARD TEMPLATE TUESDAY ***WEEK 3***

Here is my card template for week three.
if you have just stumbled across my
blog and you would like to see all the ins and outs
here is the link back to WEEK ONE


Take a piece of paper the same size as your base
(all the cards in the series with be A5)

Draw out a sketch with a ruler & pencil
 (I try to make all my measurements on the centimeter
or on the half centimeter, this makes it easier for cutting).


Take scraps of card (a different colour for each layer)
& cut out the same as the sketch.
Also write the measurements on each piece so you can either draw around each shape on your patterned papers & then cut it out,
or cut it on your paper trimmer using the measurements.


I then store the templates in a ring binder so they are to hand when I need them.


Here is another card I made with the same template, as you can see the template stayed the same, I just moved the image & the embellishments to make it slightly different.


You will be surprised how many variations you can make with the same template just by using different patterned papers & embellishments or different crafting techniques,

give it a go, I would love to see what you come up with, I hope you will find the series helpful, I would love to read your comments.
How exciting I have another follower (welcome Karen)
Back soon Kat x.

Thursday, 26 August 2010

SIMON SAYS STAMP & SHOW CHALLENGE ***TIM HOLTZ INSPIRED***

Head over to simon says stamp and show If you don't know about the challenges and read all about it.

This weeks theme is anything Lord Tim Holtz Inspired,
So I have made 6 coasters using a stamp by Tim (it's my all time favorite)
& lots of other stamps I have had & never used, as well as a lot of different distress inks,
some sticky back plastic (blue peter eat your heart out)
& bear mats (i whipped these off the table at the pub last week,
I did ask the bar maid first, lol)


Here is a pic of the back of one of the bear mats
(theirs nothing like a Guinness how cute is this squirrel lol )


Hope you like them,

I'm off to link it all up,
Back soon Kat x.


Wednesday, 25 August 2010

Sunday Stamper Challenge ***FLOWERS***

This weeks challenge is to make something that includes stamping with this weeks theme of FLOWERS
If you have been in hibernation for the past couple of years, & are not sure what I'm on about, head over to Hel's blog ink on my fingers to read all the details of the challenges she puts up each week.

With such a broad scope this week I finally decided on a wall hanging.


I narrowed down my choice to some Wendy Vecchi stamps (no surprise there then) & the BO Bunny papers I wanted to use, the rest of the project seemed to fall into place, I took my colour choice from the papers & matched the distress inks & necklace parts to them.

Here are some close ups of each panel.


Ingredients I used,
  • Half a paper mania chipboard album
  • 2 12x12 sheets of Bo Bunny papers (one design for the chipboard & one design for behind the frames)
  • Nestabilities dies (labels 1,2&3 for cutting the frames) & blue card stock
  • Wendy Vecchi stamps ( flowers,leaves,butterfly's & sentiments)
  • Grunge paper
  • Distress inks (brushed corduroy, peeled paint, spiced marmalade & tumbled glass)
  • Coffee archival ink (for stamping the sentiments)
  • Tim Holtz tattered floral die & some pages from an old book
  • 2 yards of organza ribbon
  • 10 gold eyelets
  • 1 tassel
  • Flower centers, heart pendent, beads & pearls from necklace's got at boot sales.
  • glues used, Claudine Hellmuth Studio multi medium (matte) to stick papers to the chipboard & silicone glue for sticking everything else.
wow that was a long list lol.

Here is a pic of the necklace used for the flower centers before I took it apart,


The hardest part of the whole thing was getting the pendent at the bottom to hang straight & have the bow facing forward,(after a frustrating hour of fiddling with it I realised the ribbon was twisted in the beads, so after I straightened that out it hung beautifully lol)


I hope you like it, I would be tickled pink if you would leave me a comment to read,

back soon Kat x.

Tuesday, 24 August 2010

***CARD TEMPLATE TUESDAY WEEK TWO***

I can't believe its been a week already,


Here is another card made with one of my template's

If you have just stumbled across my blog (welcome)
 just click here week one of CTT*** & read my thoughts behind it all.

OK template number 2


Take a piece of paper the same size as your base card
(all the cards in the series with be A5)
Draw out a sketch with a ruler & pencil (I try to make all my measurements on the centimeter or on the half centimeter, this makes it easier for cutting).


Take scraps of card (a different colour for each layer)
  & cut out the same as the sketch.
Also write the measurements on each piece so you can either draw around each shape on your patterned papers & then cut it out, or cut it on your paper trimmer using the measurements.


I then store the templates in a ring binder so they are to hand when I need them.


Here is another card I made with the same template, as you can see the template stayed the same, I just moved the image & the embellishments to make it slightly different.


You will be surprised how many variations you can make with the same template just by using different patterned papers & embellishments or different crafting techniques,

give it a go, I would love to see what you come up with, I hope you will find the series helpful, I would love to read your comments.

Back soon Kat x.

PRINTRES TRAY.....

I'm so excited to be showing you what I made yesterday at L B CRAFTS
under the watchful eye of the lovely Linda Brown,
(if by some small chance you don't know who I'm talking about, here is her blog yours artfully go check her out)


The photo's don't do it justice (even if I do say so myself)

I have tried to get some close ups of each panal  
(but the flash and the metal don't mix lol)


I did'nt manage to get it all stuck down in the class (slow coach) but I was so pleased about that, because when I got home I was able to play around with bits & bobs that I had, & put my own stamp on the piece.
I am really happy with it
(so much so that I can't seem to stop looking at it and I touching it lol)


If you live close enough to go to one of the classes you won't be disapointed
I have attended four and they have all been fantastic.

The next batch of classes should be on Linda's web site lb crafts in the next few days
& the date they go on sale (but be warned they sell fast)

Well thats it for today, ttfn Kat x.

Friday, 20 August 2010

TISSUE BOX TASTIC...

I love making these tissue boxes,
The template is from Creative Expressions.


This one is made in the same way as the mirror a few posts ago,
All you do is measure the surface you want to cover, then chop the card up into stamp able sized pieces, as you can see I used all time related stamps again ( I seem to be drawn to time stamps like a bee to a honey pot,I can't seem to resist a clock style stamp, I think it's an illness, trouble is I don't want a cure ) LOL.

I used WALNUT STAIN to stamp the images with ,
then blended with BRUSHED CORDUROY & PEELED PAINT on all the pieces,
I then stuck them back together again onto the tissue box.

Here are some close ups of all 4 sides,


I find that the tissue boxes are an easy object to try out new crafting techniques on,
They also make up quite quickly & easily,
as well as being practical they make a great gift to give someone who is unwell to cheer them up.


Hope you like it,

Oh how fab I noticed I have another follower ( welcome Kristi )
I love to read all your comments, it puts a big smile on my face
to think that people have taken the time to post them, 

Well that's it from me today, back soon Kat x.

Thursday, 19 August 2010

FRAMING MY FREE STAMPS....


I thought I would show something today, that I made using a colour combination I would never have thought of putting together, if it wasn't for an article in this months (September 2010) Craft Stamper Magazine.

It's a piece made by designer Sue Abbott on page 40, her's it's a vintage style frame, the colour combination is TEA DYE & MILLED LAVENDER distress ink's ( how gorgeous )


My piece is made out of something I got from a boot sale for 20p (bargain)
at the time I wasn't sure what it was, but I knew it would come in handy for something,
originally it was black.

Inspired by the article I painted it with antique white acrylic paint
( 4 coats) then distressed it with tea dye distress ink,
by rubbing the ink pad over,then wiping some of it off with a baby wipe, to leave a mottled affect.
I cut 4 pieces of card, distressed them with  tea dye then stamped a flourish in milled lavender over the top.
I then used the free cover stamp & I also used 3 other free stamps from previous months,
I used a versa magic ink pad (jumbo java) to stamp the images on scraps of card, distressed them & cut them out.
I used a Martha Stewart punch for the decorative strips & I raided my stash for other bib's & bob's,
(the butterfly's are from a bracelet I took apart & the cameo is in fact a candle decoration).


I then layered it all up with silicone glue, I was able to get a good amount of dimension, because of the depth of the frame (not sure if the camera picked that up thow?)


I hope you like it, back soon Kat x

Wednesday, 18 August 2010

JARS/BOTTLES/BOOZE CHALLENGE & WENDY VHECCI-STUDIO 490 STYLE CHALLENGE...


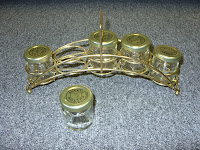
A work colleague gave me this lovely set of jam's for Xmas last year,
& they have been sitting on top of the fridge ever since.
when I saw this weeks challenge jars/bottles or booze
on Hel's blog  ink on my fingers (head over there to check it out)
I took the title literally & I knew I had to use them,
so after a lot of label picking & washing out they were ready for altering.


I used a selection of stamps from the very fabulous Wendy Vecchi's range,
a circle punch, distress inks(peeled paint, rusty hinge & broken china) & some metal buttons from my stash.

here's a pic of the stamps I used


As I sat there admiring my finished piece, it suddenly dawned on me,I could submit this for the
Wendy Vecchi-studio 490 style challenge over at
 simon says stamp and show. (head over & check it out)


I have already entered this frame in this weeks challenge,

So am I allowed to enter another piece? I don't know? oh well if I'm not I'm sure someone will let me know.


I hope you like it,

OK I'm off to try & link this post to all the right places (I'm still knew at this computer lark) LOL
wish me luck Kat x


Tuesday, 17 August 2010

***CARD TEMPLATE TUESDAY***

I thought I would share with you a big tip that I have developed over the past few years that helps me produce cards quicker & easier,
in the form of a series of simple template's, that you can adapt to any type of card making.

I have decided to challenge myself, to post one template every Tuesday along with a card I have made using it, (hence the title card template Tuesday)
I have also decided to make all the cards for each week out of the same basic ingredients & just change the template & the patterned papers, to show if you have limited resources you can produce many different cards using the same stuff, just by changing the template.
If you have limited time or lack of inspiration I find the templates help me over come these hurdles,(we all have lack of crafting mojo some times)

The whole template thing started because I would make a card I was really pleased with, give it to the recipient (all smiles and proud) LOL, then not remember how I made it. so I came up with keeping a card template folder, that I could turn to. I find that the designing of a card takes a lot longer than the making of it,not to mention the constant measuring.

Wow I have really waffled on haven't I (sorry about that)
So here we go WEEK ONE, card, followed by the template.


Take a piece of paper the same size as your base card
(all the cards in the series with be A5)

Draw out a sketch with a ruler & pencil (I try to make all my measurements on the centimeter or on the half centimeter, this makes it easier for cutting).

Take scraps of card (a different colour for each layer)
& cut out the same as the sketch.
also write the measurements on each piece so you can either draw around each shape on your patterned papers & then cut it out,
or cut it on your paper trimmer using the measurements.

I then store the templates in a ring binder
so they are to hand when I need them.

Here is another card I made with the same template, as you can see the template stayed the same, I just moved the image & the embellishments to make it slightly different.


You will be surprised how many variations you can make with the same template just by using different patterned papers & embellishments or different crafting techniques,
give it a go, I would love to see what you come up with, I hope you will find the series helpful, I would love to read your comments.

speaking of comments thank you so much for them on yesterday's post, I was chuffed to bits,
I also have one more follower how FAB is that.

well I'm tired out after all that writing
(It's not one of my strong points,
I spend more time in the dictionary than I do anything else) LOL
Back soon Kat x

Here's some close up pictures of what's on this blog..

Related Posts with Thumbnails